

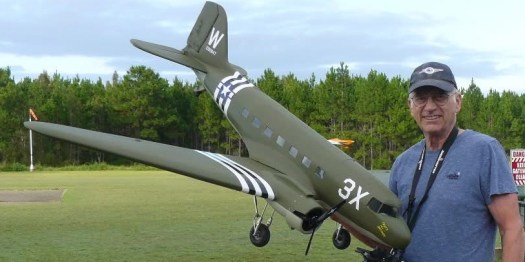
About a year ago our club president listed a number of items on our group Facebook page that were being sold by a former hobby shop owner in our area. One plane that caught my attention was this C-47. I was wanting a twin, and I love warbirds. Furthermore, I had actually ridden in a Dakota when I was a kid. A very small kid, because I wasn’t tall enough to see out the windows! I understand that I fell asleep during that flight! So much for developing a love of aviation!
Anyhow, I bought that plane along with several other items, and soon discovered that I had a lot of work to do. The plane was old. I don’t know how many years, but it was pulled out of a not terribly weatherproof shed, and from all the dust, cobwebs and rust, it clearly had lived there many years. Given that it did have electric motors installed, I suppose it wasn’t really in the 20-30 years age bracket that it looked like. It’s made out of balsa and ply. Part of the exterior was painted, but the balsa panels were sagging in between bulkheads, and some of them had been sanded down paper thin due to being sanded after the sagging had started. The landing gear were rusted, and they wouldn’t hold the plane up without the servos powered. The wing was pretty hacked up where the fuselage went over it, and inside the engine nacelles where the landing gear mechanisms were attached. And there were no cowlings for the front of the nacelles.
In this video, RC Jim shows you the plane in its initial condition, and discusses the potential issues and his plans for finishing the build:
It was quite a while before he got stuck into the work on this plane, but that gave Jim plenty of time to brainstorm various ideas, especially concerning the design of improved landing gear. It was important to have the following characteristics:
- Suspension to keep the plane from busting in half on a hard landing.
- A locking mechanism that doesn’t require the servos to hold the gear in the down position with torque.
- Durable materials that can take a beating but without adding significant weight.
- Something that we will be able to build!
- Something that will fit in place where the old gear were located.
- Something that looks very similar to the landing gear on the full-size plane.
So, Jim put on his engineering hat, sketched out several concept designs, and continued to evaluate and modify them several times before building anything. The following two videos take you through this process:
While he thought that the work on the landing gear was finished at the end of that last video, in actual fact several further modifications were made along the way, and at the very end it was decided to operate the landing gear on two separate radio channels so that the up and down positions could be individually adjusted, avoiding unwanted stress on the components due to very slight differences between the two mechanisms. Part of that had to do with the two retract servos being placed facing each other, meaning that if the servo arm was on the top of each of them, one would be pushing and the other pulling, unless a reverse servo was used for one. He did try using a servo reverse lead that should have done that, but it didn’t work! Along the way, a couple of different servos were tried, each change providing more power and greater travel.
The next step along the way was to work out where the centre of gravity needed to be located for proper flight, and, related to that, where the battery/ies should be located. There was a compartment under the wing that appeared to be suited for that, but when doing the balancing it was discovered that the battery/ies needed to be located in the nose to get the CG in the right place. That involved designing a battery compartment with access in the forward part of the fuselage. This video shows you how that was done:
At this stage we were beginning to see the light of day. Jim hooked up a receiver and battery and tried out the motors. Initially they both worked, then one quit. Given the apparent age of the electronics, it was decided to replace the motors and most of the wiring. In operating the landing gear some issues were noted, and so more work was done on them.
Looking up the thrust that the original motors were supposed to develop and the weight of the plane, Jim felt that it would be underpowered to use them or the equivalent. So, he did some research, and came up with a solution: a pair of racing drone motors. Tiny little things that can run on 6s and develop nearly double the thrust of the original ones using props that can fit. Had it been a single engine plane there wouldn’t have been a big issue, as it would be able to swing a large prop. But the C-47 of this size can only handle a 10 inch prop to clear the fuselage. A three bladed one would suit, as that’s what the full size plane would have, but that still isn’t a great way to develop the needed thrust. Hence, little motors running at high rpm.
Related to the motors was their mounting and cowlings to cover them. The old motors were mounted with aluminium mounts that fastened to the front of the motors. Jim scrapped those and built plywood mounts offset from the firewall with bolts. The cowlings were a big issue. Making them with fibreglass or vacuum forming was considered, but Jim figured if he could find umeasuring everything from peanut butter jars to olive containers. He ended up finding online some little buckets that were about the right diameter. They needed to be cut down and the bucket bottom formed into the front of the cowl. This next video shows you how he worked through these challenges:
We were now on the home stretch! Further work was done on the electronics, including installing an eight channel ELRS receiver. Previously it was planned to use one 4s battery for each motor, but with the move to 6s, it was decided to go with a single battery. That will help to keep both motors running with the same level of power as the battery voltage drops during the flight. Two separate batteries could decline in voltage at different rates causing a problem. And, with 6s it is likely that most of the time the plane will be operating at even less than half throttle, giving adequate flight time.
While Jim initially had thought he would wait on painting the plane until it had proven that it could fly, he couldn’t resist – and the horrible weather at the time was allowing more time in the workshop. So, Jim bought a sample tub of paint, got out the spray gear, and got it looking really nice. This video shows all of that:
The final step was to cut the vinyl stickers for the lettering and stars and bars roundels. Here’s the video showing that being done and the final outcome:
Now for the maiden flight…
I would love for this to be a wonderful fairy tale ending for you, and I’m tempted to not even tell you what happened. But it did. And it’s part of the real story…
But this really isn’t the end. I’m going to build another C-47. This will be one built from foam sheet, but it will be big, and hopefully both beautiful to look at and even better to fly! So, stay tuned!
