

Lemon RX continues to impress us with the development of their excellent receivers. Having a low-cost alternative to Spektrum®, while still being compatible to DSMX® has been great. And Lemon RX have always impressed us with their reliability and excellent stabilization. Over the years they have been working at making their setup and programming easier, and I have now gotten used to selecting the flashing lights during setup and find that quite easy. But now they have gone a step further with their Gen 2 receivers, allowing you to do most of the programming through your transmitter. And the transmitter can be one from Spektrum® or even one with Edge TX, such as Radiomaster.
So, are you excited to find out how to do it? Here are the simple steps:
- Update the firmware on your transmitter, if it’s not current.
- Bind your transmitter to the new Lemon RX Gen 2 receiver.
- Power on the transmitter.
- Navigate to the “bind” menu on your transmitter, but don’t press the button yet.
- Power on the receiver.
- Hold the “B” button on the receiver until it starts flashing rapidly, then let go.
- Execute the “bind” on the receiver.
- Check to see that your four basic channels (aileron, elevator, throttle and rudder) all go to -100/100 when you move the stick all the way in each direction. If not, return the gains to 100%. That can be on a single mode that you have selected.
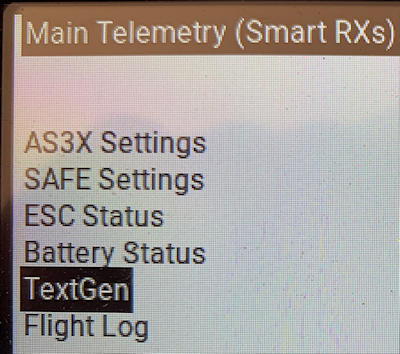
- For a Spektrum® DX or NX radio, go to “Function List” and select “Telemetry.” Scroll down to an “Empty” item, and select it. Scroll through that down quite a ways to “Text Gen” and select it. When you have done that, make sure it is “Act” (Active) not “Inh.” Go back to your main screen, and with the receiver powered up, scroll to the right until you come to the “Lemon RX” telemetry page.

If you have a transmitter running Edge TX, press the “SYS” button, select “Tools,” then select “DSM Smart RX Telemetry.” In that screen, then select “TextGen.”
With either of those, it should then show you the current settings for the receiver.

5. Unplug the power from the receiver, then plug it back in again.
6. Within 60 seconds, pull your transmitter control sticks all the way down and to the outside.

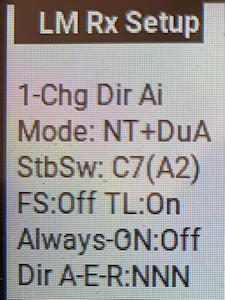
Hold them there until the display changes to show this:
7. Note that with any of these stick movements, the programming is looking for something very close to +100 or -100. Most transmitter control sticks will go below or above that when pressed all the way to the limit, depending on how hard you push on it. If it’s not working for you, get into a transmitter display that shows you the % value for each of the sticks, and see what you need to do to hit +/- 100.
8. The first line in the body of the text will have a number in front of it.
That’s the menu item that you can change on that screen. The lines below it displays the status of all the items, not just the one you can change.
9. To edit the item, press the elevator stick down. I’m assuming you are in mode 2. As you look down to that item, you will see it has toggled between the value choices. Press down again, and it will change back. With your stick movements in the menu, all it takes is a movement of the stick to the limit, then right back. Sometimes it then takes a second or two for the action to show on the screen.
10. To move to the next item in the menu, move the aileron stick all the way to the right or left. Here is a list of the menu items:
- 1-Chg Dir Ai (Change direction of aileron response in stabilization. Note with this and the two items below, the three controls are listed first, “A-E-R” = Aileron, Elevator and Rudder, then the three settings follow in order: “N” is normal, “R” is reversed)
- 2-Chg Dir El (Change direction of elevator response in stabilization)
- 3-Chg Dir Ru (Change direction of rudder response in stabilization)
- 4-Chg Dual Ai (Single or dual aileron channels – the “Mode” is displayed first, “NT” or normal tail being the default. It then adds “DuA,” dual ailerons if you have selected that – see item 8 below)
- 5-Show Config (Show the configuration menu, and make menu items 8 to 15 able to display and be edited. Move elevator stick all the way up or down to select.)
- 6-Exit & Save (Press down to exit the menu and save your settings)
- 7-Ex & No Save (Press down to exit without saving the changes you have made)
- 8-Chg Mode (Change mode:
DT – Dual servos for elevator
VT – V tail
RxOnly – no stabilization, just operate as a normal receiver
NT – Normal tail, single channel for elevator, single channel for rudder.) - 9-Chg Stb Sw (Change the switch used to turn stabilization on or off)
- 10-Chg Alys On (Used when you don’t have enough channels to turn stabilization on or off)
- 11-Chg TL (Turn throttle low “TL” on or off. With it “on,” if the receiver goes into failsafe mode, it will send a low throttle signal (-100) for less than a second, then stop sending any signal. This is needed for some ESCs which will keep the throttle going for a while after loss of signal from the receiver. It may or may not be appropriate for a some situations. See John’s comment below for further detail. Note that he refers to it as “throttle lock.”
- 12-Cancel FS (Return failsafe “FS” to default value. See the videos at the bottom of this article for instructions on how to set the failsafe to user selected values.)
- 13-Rs Rx (Reset all receiver settings to factory default values)
- 14-Cal V (Calibrate voltage “V” displayed via telemetry)
- 15-Cal I (Calibrate current “I” displayed via telemetry)
- Sys Info (Date of system firmware in receiver)
There is an additional item that displays when you are not editing the items: “M Gain %.” It’s the level of gain that you have set on channel 8. You should have that assigned to a dial on your transmitter. It acts as a multiplier to the settings on the receiver pots. -100 will nearly turn it off. 0 (middle position of knob) will not alter the gain set on the pots. +100 will nearly double it. Turning the dial left or right will reduce or increase that value. The “nearly” that I refer to is due to the fact that the radio is capable of sending signals beyond the -100, +100 range.
That should give you all that you need. Keep in mind that you can still do the basic setup routine using the lights on the receiver, but using your transmitter gives you both greater control as well as a clear picture of what all the settings are.
Note that if you want to set Fail Safe to custom settings, you still do that using the “F” button on the receiver.
As always, happy flying!
RC Jim
Other related YouTube videos that you may find helpful:
Download a pdf of the article suitable for printing:
Permission is granted for individuals and clubs to print and use this information for their own non-profit purposes. Should any damages result from using this information, no responsibility is accepted by James Massey or RC Jim. Make sure that everything is safe, and test everything before flying.
RC Jim has received sample receivers from Lemon RX for testing and review, but that all began with Jim purchasing one and realising that it was a great product at a great price.
Jim, just for info your statement “11-Chg TL (Turn telemetry “TL” on or off)” is incorrect.
TL refers to “Throttle Lock” not telemetry.
It is a function that alters fail-safe behaviour.
There are two user-set fail-safe options set by Throttle Lock (TL = On/Off in the TextGen menu).
User-set fail-safe operates as follows if transmitter signal loss is detected by the receiver:
1) If TL is ON, for the first 0.1seconds a series of Throttle OFF commands (-100% on transmitter channel 1) is sent, then all channels go to logic low. That is, no servo pulses are sent. The effect of this is to force the ESC to zero instantly, then stop servo pulses. This is because a few ESCs will run the motor briefly when signal is lost if the last known throttle channel value isn’t -100%. On a normal electric model the motor stops instantly and the control surfaces will stay where they were when signal was lost while the receiver rapidly looks for a valid signal. If found, full control is restored.
After 2 seconds, if user-set fail-safe is set, then the receiver will output user-set channel values to all the connected servos/ESC indefinitely until a radio signal is found.
2) If TL is OFF, for the first 0.1seconds then all channels go to logic low. That is, no servo pulses are sent. In almost all cases on a normal electric model the motor stops (as the ESC detects a loss of control pulses) and the control surfaces will stay where they were when signal was lost while the receiver rapidly looks for a valid signal. If found, full control is restored.
After 2 seconds, if user-set fail-safe is set then the receiver will output all user-set channel values to the connected servos/ESC indefinitely until a radio signal is found.
If user-set fail-safe is not set then the receiver will in all cases output no pulses until the signal is restored.
Why the difference between TL = On and Off?
TL defaults to On so that normally when user-set fail-safe kicks in, the Throttle (channel 1) is immediately changed to -100%. All channels move to the user-set fail-safe positions after a second or two. This works well for the majority of people flying Spektrum channel-order electric planes and effectively the behaviour of TL=On and TL=Off will be the same. The advantage of TL = On is that instant motor stopping is guaranteed. But some of the glider guys use Channel 1 for a different purpose such as a flight control surface and having it immediately move to -100% on failsafe was an issue – sometimes an alarming one! Hence the option to have it Off.
Thanks, John, for the correction and the additional information. I learned that right after I published the video, but apparently didn’t update this document on the website. The video has already been updated, but I’ll edit the document and post now as well. RC Jim
Looking at it now, I see I had indeed corrected it to show TL as “Throttle Low.” John, you must have seen it within the first 12 hours or so after it was first published. If it’s still showing that way, your browser is giving you old information. None-the-less, the further information is especially helpful. The bit about the sailplanes was something I was not aware of.
Thanks, Jim. I think Throttle Low is probably the better term as that essentially describes the action – “Force Throttle low briefly”.
Lemon call it Throttle Lock, but I am going to suggest that they change that when they eventually put info about the capability on their web page. Throttle Low is a bit more intuitive.